配置 Root 账户登录
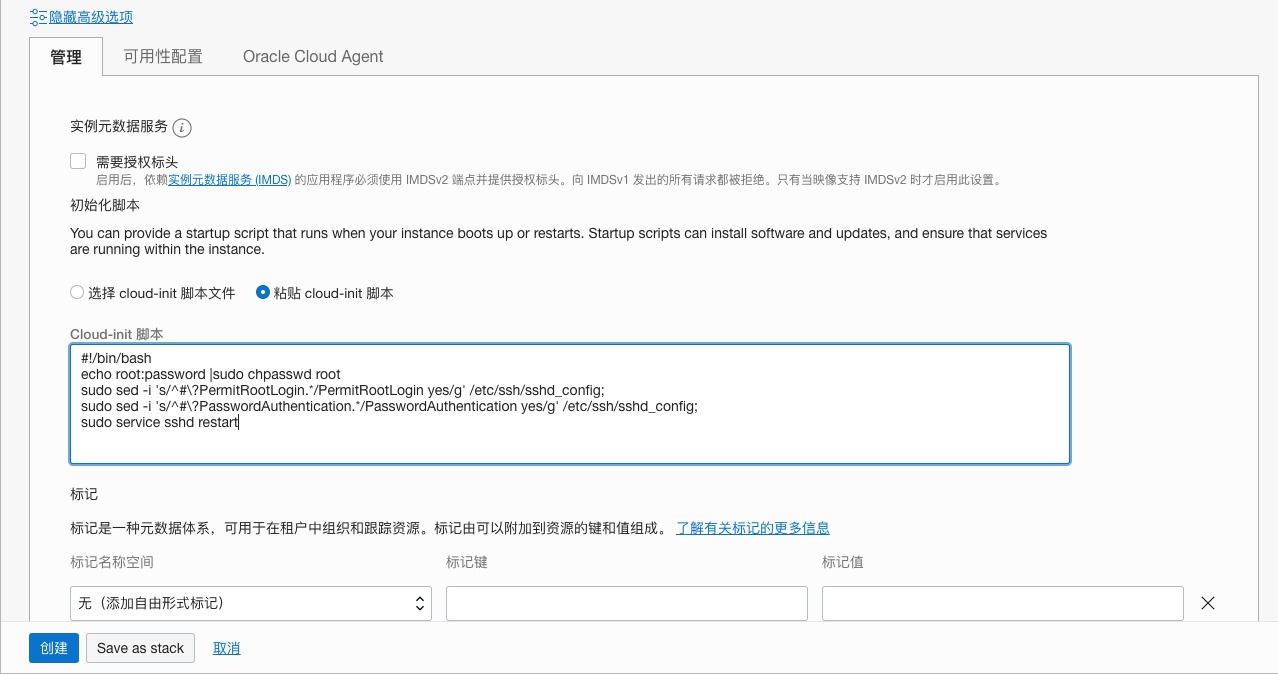
创建服务器时选择 粘贴 cloud-init 脚本,默认密码为 password
#!/bin/bash
echo root:password |sudo chpasswd root
sudo sed -i 's/^#\?PermitRootLogin.*/PermitRootLogin yes/g' /etc/ssh/sshd_config;
sudo sed -i 's/^#\?PasswordAuthentication.*/PasswordAuthentication yes/g' /etc/ssh/sshd_config;
sudo service sshd restart
卸载无用程序
systemctl stop rpcbind
systemctl stop rpcbind.socket
systemctl disable rpcbind
systemctl disable rpcbind.socket

systemctl stop oracle-cloud-agent
systemctl disable oracle-cloud-agent
systemctl stop oracle-cloud-agent-updater
systemctl disable oracle-cloud-agent-updater
使用 BBR 加速
更换内核
yum -y update
wget https://raw.githubusercontent.com/chiakge/Linux-NetSpeed/master/bbrplus/centos/7/kernel-4.14.129-bbrplus.rpm
yum -y install kernel-4.14.129-bbrplus.rpm
grub2-mkconfig -o /boot/grub2/grub.cfg
grub2-mkconfig -o /boot/efi/EFI/centos/grub.cfg
grub2-set-default 0
reboot
开启 BBR & 优化
运行脚本后,选择 7,再选择 10
wget -N --no-check-certificate "https://raw.githubusercontent.com/chiakge/Linux-NetSpeed/master/tcp.sh" && chmod +x tcp.sh && ./tcp.sh
配置科学上网
服务端安装
wget --no-check-certificate -O shadowsocks-all.sh https://raw.githubusercontent.com/teddysun/shadowsocks_install/master/shadowsocks-all.sh

chmod +x shadowsocks-all.sh

./shadowsocks-all.sh 2>&1 | tee shadowsocks-all.log
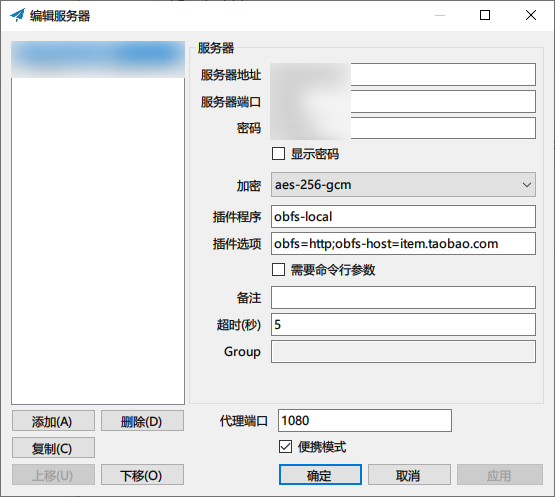
客户端配置
Download
客户端添加配置时,注意以下两栏内容:
插件 : obfs-local
插件选项 : obfs=http;obfs-host=item.taobao.com
Windows 客户端需要下载 obfs 混淆插件,下载插件后,放入 Shadowsocks 根目录下。obfs-host 是待伪装的网站,可以自定义。